

When I first joined Pinterest, it was a place for me to store all the ideas I saw all over the internet that I wanted to try out. But soon, it became collections upon collections of things that looked pretty, looked intriguing, things I wanted to make or try, things I wanted to remember, or things that inspired me in some way. So I feel like it's time to go back and look at those things I first pinned and do some creating.
This particular project/pin wasn't one I had thought to complete so soon. I loved the look of the crocheted doilies simply bound in the embroidery loops, letting the hand-work be the art.
But finding the doilies to create the art would take some time. Scouting antique stores was deemed necessary. But before I could even begin to think about starting that adventure, I inherited LOTS of doilies.
 |
| Seen here |
I may have mentioned before that my mom crocheted, a skill she learned from my great-grandmother. My mom could crank them out, too. She was super fast and made them all the time. She made them for birthdays, weddings, Christmas, or just because. In going through her crochet things, I came across a piece she had started, but was unable to finish before she left us. It was our last name. I remembered asking her to make us one {as she had done for my aunt when she was married}, and she had told me she had started, but didn't like how it looked, so she undid it all. I didn't know she had started over. It is such a treasure to me now. It's framed, sitting in our living room, unfinished as it is, just like she left it.
Ok, I divert. My point being that I finally had enough of those sweet crochet beauties to make an art collection.
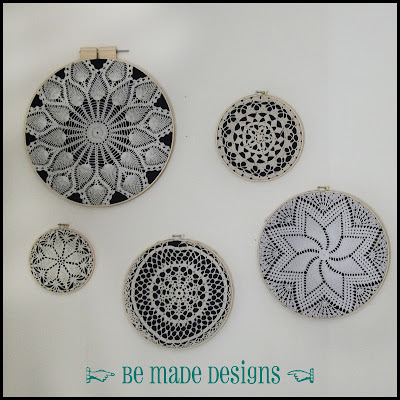
The only thing I wasn't crazy about with that original set-up is you can't see the details because the threads are the same, or nearly the same, color as the wall. That's the beauty of a doily: the pattern. It's not just about weaving thread together but creating patterns with that single piece of thread.
So I decided to back my doilies with a dark fabric so the pattern would pop.


I used a navy blue cotton--a great contrast with the neutral doilies--and cut squares about a couple of inches or so larger all around my doily.


I tried a couple of techniques to attach the fabric and doily to the embroidery hoop, and here's what worked best for me.
First, I enclosed the fabric in the hoop. Then I trimmed the fabric so that there was about an inch overhang around the hoop.


Next, I hot glued the fabric to the hoop. This ensured that the fabric would stay taut while I tried to then attach the doily. It also helped me better center the designs and try to get the edges evenly arranged around the hoop. That was the hardest part since the woven threads tended to NOT pull evenly. You'll see in some of my finished hoops that some edges are pulled a little more than others, and that was after several tries getting it even. Sometimes, you just gotta go with it, ha ha!


Some doilies were more difficult than others to find a hoop the right size. There are a couple of doilies that ended up having quite a bit of their edges "cut off" because the next size up hoop was just too big to work at all. So I had to go a bit smaller.

I ended up with 9 doilies total so I knew I needed a large wall for display. The only wall big enough and easy enough to access is in my living room. Which meant I had to lose my existing art. {sad face} But I think it was time to rotate out art anyways.
This meant I had to split the doilies on either side of my crosses because they weren't something I wanted to move. There are too many memories there, too. Nearly each one has a story.
 |
| Original Look |
After arranging on the floor, the doilies were ready to hang. The right side went up easy.

The left was another story. It looked good on the floor, but didn't quite translate to the wall. So, I have some holes to fill after moving each one at least a couple of times. Oops.

The left was another story. It looked good on the floor, but didn't quite translate to the wall. So, I have some holes to fill after moving each one at least a couple of times. Oops.

But I love how they look. And I love how each design pops on its own, yet flows from one to the other. And I love looking at my walls and seeing my mom's creations, things her hands made.


I love this picture below. The rocking chair belonged to my great-grandmother, the same one that taught my mom to crochet the doilies hanging above it. The little side table was made by my father-in-law and is engraved with our monogram. I love all the family history in that one moment. {Remember those moments I mentioned a while back?}

I love the new look. And it's just one more step in revealing the totally new look for our living room. Just a couple more projects and it'll be done. For now. Ha ha!

ta ta
for now :)

Linking up here:
Hi, great idea putting a contrasting colour behind your doilies. They really do pop and we can see all the detail even from some distance. Fantastic job at displaying your treasures.
ReplyDeleteI'm stopping by for a quick visit form Get Schooled Saturday Linky. I am pinning your version.
Thanks so much! And thanks for stopping by! (:
Delete